Wednesday, February 29, 2012

Variegated Purple Heart

Purple Heart is a pretty great plant. The striking purple color of the leaves and little purple flowers are hard to beat.

Purple Heart is super easy to grow in sun or part sun and requires very little water.  It looks great as ground cover or sprawling over a wall.  The picture below was taken last November. 

Purple Heart is hardy in zones 8 - 11.  In Zone 8, where I live, Purple Heart normally dies back during the winter months, but comes back from the roots in the spring.  Of course, this winter was so mild it hardly died back at all.

With everything Purple Heart has to offer, it's hard to believe it could be topped, but check out this Variegated Purple Heart. 

The variegation ranges from dark purple to light purple and pink, with cream and green thrown in for good measure.

The Variegated Purple Heart is a welcome addition to my garden.  Hopefully, it will be a fast grower.  I have a feeling I'll be taking lots of cuttings of this fabulous plant.  

Wednesday, February 22, 2012

Rutabaga Oven-Baked Fries

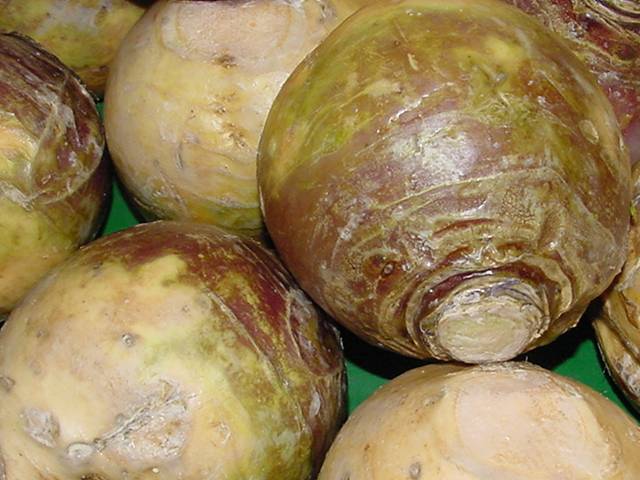
Rutabaga can be grown successfully in Texas, and the rutabaga from your garden will put those wax coated, grocery store rutabaga to shame.  In the grocery store, a rutabaga will look something like the picture below.  I think they coat them in thick wax to prolong storage.

A rutabaga from your garden will looking something like the picture below.  This rutabaga is called 'Purple Top'.  I guess you can see where it gets it's name. 

In order to be successful growing rutabaga, I have always started my seeds indoors around the July/August time frame.  The conventional wisdom is that root crops don't transplant well, but starting rutabaga seeds outdoors in the Texas summer, or even fall for that matter, is just not practical.  I start mine indoors and keep bumping them up until the temperatures cool and I can finally plant them.

Back in October 2011, I planted these little rutabaga transplants into the garden.  In the picture below, the rutabaga are under netting to protect them from the local wildlife.  Due to the severeness of our drought at the time, the birds were eating any seedlings they found in the garden.

I harvested my first rutabaga in December shortly after we had our first freeze.  It was pretty tasty, but rutabaga flavor only improves when the temperatures get colder.  The plants can get quite large and by February the rutabaga are as big as honeydew melons.

 When a rutabaga is lifted from the ground, the top foliage and the roots can be cut away with a knife.


Friends always ask me, "What do you do with a rutabaga?"  My favorite preparation (see mashed rutabaga)  is to cut the rutabaga into pieces and boil until they are soft.  Then, I mash the softened rutabaga with butter, salt and pepper.

Rutabaga are tasty in beef stew or with pot roast.  Basically, any time you're serving potatoes and carrots, rutabagas will fit right into the menu.  

I have a garden full of rutabaga, so I've been on the lookout lately for some new rutabaga recipes.   I saw several recipes on the internet for rutabaga oven-baked fries, so thought I would give that a try.  

To prepare the fries, cut the rutabaga into 1/2 inch slices and thoroughly cut away the outer peel. 

Cut the slices into strips that resemble hand-cut french fries, and drizzle the fries with olive oil.  Bake at 425 degrees for 12 minutes or until the fries are tender when pierced with a fork.  


The fries will be soft and not crispy like actual french fries.  This was a little disappointing, so I attempted another batch at 350 degrees for 25 minutes to see if I would get a different result.  Unfortunately, the result was pretty much the same. 

To serve, sprinkle the rutabaga with garlic powder, paprika and kosher salt.  Even though they were not crispy, they still made a tasty side dish.


Sunday, February 19, 2012

Brown-headed Cowbird

Two weeks ago I was surprised and excited to find a new bird in my front yard.  My excitement quickly dissipated when I discovered the new visitor was a Brown-headed Cowbird.  Now I’m just beside myself wondering what to do as we appear to be Cowbird central for about 5 males and 4 females.
Male Brown-headed Cowbird
Cowbirds are bad news.  They are referred to as “brood parasites”, because they lay their eggs in the nests of other birds.  The female Cowbird lays about 40 eggs in a year.  Many of these eggs are laid in the nests of song birds.  
 
Some species of song birds such as the Black-capped Vireo may be threatened by these birds.  According to the Texas Parks and Wildlife website, “studies have shown that the removal of one female cowbird enhances the survival of 35 songbirds per year.”
Male Brown-headed Cowbird (left) and Female (right)
When the female Cowbird lays her egg in the nest of another bird, she will sometimes destroy one or more of the eggs already in the nest.  Sometimes the Cowbird chicks even push the other chicks out of the nest, so that the host bird ends up raising a Cowbird and no actual chicks of her own.  With this sort of behavior, it’s easy to see why many attribute the decline in the songbird population to the Cowbird.


Wednesday, February 15, 2012

Bloom Day from the Greenhouse

A friend told me today that one of the things she liked about greenhouses was their quiet energy.  My greenhouse quiets my soul.  It makes me feel serene and helps to eliminate the stresses of my day for a little while.  There's so much beauty to be found and today I'd like to share some with you.

Mother of Millions is a common plant that is easy to share with others.  Many baby plants are born on the leaves of the mother plant, and when they fall to the ground each one sprouts into a new plant.  This plant was shared with me in this way.  I was given multiple babies and they grew and grew until finally this winter they flowered.  It was quite unexpected, and because it was unexpected, it was all the more special.


In a heated greenhouse environment, hibiscus never stop blooming, but it doesn't make them any less beautiful.


Propagated from a cutting during my Master Gardener class in October 2011, Country Girl mum is about as cheerful as they come.  My little cutting has grown up and is already blooming.  They grow up so fast.  Sigh...


Bougainvillea are rather ubiquitous here is Texas, but there are probably not many blooming in February like this specimen.

I bought this abutilon from Barton Springs Nursery where they used to have a magnificent specimen growing in a moist, shady spot.  I think it died last winter during the 17 degree cold snap.  You normally can grow these in the ground, but I've never been able to keep mine watered enough, so I've been growing this one in a pot.


During an upper east side garden tour, some generous home owner gave me my first angel wing begonia cutting.  I carried it around all day in a diet coke can till I could get home and plant it.  Today, I have many of these easy to propagate plants, which I share with anyone who asks. 

This desert rose, adenium obesum, has not stopped flowering all winter.  It really likes life in the greenhouse.

Globe mallow is not a greenhouse plant, but this guy has been living the high life in the greenhouse for months. I'm going to plant it outside in the garden soon.  I've heard these plants are reliable bloomers that will continue to bloom during a mild winter.

The wonderful smell of this Meyer's lemon in bloom promises many juicy, sweet lemons to come.

While neither of the next two plants are blooming, I just had to share them.  The first is a new addition to my collection called a paper spine cactus.  The spines are not sharp and this plant is just too cool!

My final plant is one of my all time favorites.  This is Persian Shield.  Technically not in bloom, this plant can put a lot of blooms to shame.  Grown in the shade, this plant really pops.

I hope you enjoyed these beautiful flowers from my greenhouse.

Happy Bloom Day!  Please visit May Dreams for more great Bloom Day blogs.

Sunday, February 12, 2012

Be the Bee: A Look at Hand Pollination

Pollinating by hand is easy, but monotonous.   Bees are hard workers, and hand pollinating makes me appreciate their labors more than ever.

In order to duplicate bee activity and become the pollinator, it helps to understand what needs to happen.  The pollen, which is located on the anthers, needs to move to the stigma. Bees do this naturally as they move around each flower collecting nectar.   The anthers and stigma are illustrated in the drawing below from the American Museum of Natural History.  

Here's a picture of a Mexican lime blooming in my greenhouse today.  It's anthers are laden with pollen and the stigma is sitting in the middle of the flower waiting for the pollen to arrive.

While most citrus is self-pollinating, I like to increase pollination by placing my plants outside for the bees to visit.  Considering we've just had a cold front roll into town, this is not practical.  I think I'll leave my citrus in the greenhouse and try my hand at some manual pollination.

I'm using a small paint brush to pollinate, but you can use a cotton swab, a pencil eraser, or even your finger among other things.  The idea is to visit each flower touching both the anthers and the stigma with each visit.

Be the Bee.  Funny, after just a few flowers, I'm already worn out and little bored.  How do bees do it?

The ovaries of the pollinated flowers swell to produce fruit.  This Mexican lime was a heavy producer last year and looks like it's already on it's way to producing lots of fruit again. 

Try your hand pollinating some time.  You will quickly come to appreciate bees.  I sure do!

Wednesday, February 8, 2012

When Life Gives You Giant Cauliflower...

Much needed winter rains have my garden vegetables doing the happy dance.


Harvesting this guy was like boating a marlin.  I had to use my large garden loppers to cut it loose.  Even after removing all the leaves, I had to cut it in half just to fit it in the fridge.

So, when life gives you giant cauliflower, it's time to find some new recipes.  Here's a roasted cauliflower recipe I tried today.  It was actually very good.  I hope you'll try it sometime.

Roasted Cauliflower

Ingredients:
Cauliflower
2-3 cloves minced garlic
Lemon Juice
Olive oil
Salt and Pepper
Parmesan Cheese

Instuctions:
Preheat your oven to 400°F. Cut the cauliflower into pieces and place the pieces in a single layer in a baking dish. Sprinkle the garlic and lemon juice over the cauliflower.  Drizzle each piece of cauliflower with olive oil. Salt and pepper to taste.  Bake uncovered for 25-30 minutes or until the top is lightly brown and a fork can easily pierce the cauliflower. After removing the cauliflower from the oven, sprinkle generously with Parmesan cheese .

Cauliflower prepared and ready for the oven
Roasted cauliflower ready for the dinner plate

Saturday, February 4, 2012

Austin Organic Gardeners' Spring Plant Sale

Austin Organic Gardeners' Spring Plant Sale
Date:  March 3, 2012
Time:  9:00 a.m. to 2 p.m.
Place:  Zilker Botanical Garden

Vegetable, herb and ornamental transplants will be available

The Austin Organic Gardeners (AOG) club members have been preparing for the annual plant sale for weeks.  The plant sale is an important fundraiser for the club.  

I started working on my contribution to the plant sale just before Christmas.  My first step was to expand my grow rack to accommodate more plants.  My homemade PVC grow rack can comfortably accommodate four flats.  
  
Inexpensive T12 shop lights using blue spectrum, 6500K, daylight deluxe bulbs provide the light needed to grow seedlings and propagate cuttings.

In December, I started trailing rosemary cuttings.  I sure wish these cuttings looked a little better, but they're not dead, so at least that.  To save space on the grow rack, the cuttings have been moved to the greenhouse.  I'll try to coax them along with a diluted solution of fish emulsion and seaweed.


At the same time I started the rosemary cuttings, I also started sweet basil from seed.  The basil is my pride and joy.  I just think these little guys are adorable, and they already smell great too!


During our January AOG club meeting, I learned that we needed more peppers.  I've never grown peppers before from seed, so I thought it would be fun to try.  Peppers need soil temperatures of 85-90 degrees, so I decided to purchase an inexpensive heat mat.  On January 11th, I started California Wonder bell peppers and by January 29th, the peppers were ready to be bumped up to 4 inch pots.
A plastic spoon serves as a scoop.

Seedlings are gently placed into their new home.
California Wonder pepper seedlings at 18 days.
Excelling past the others, 2 plants (front left and middle) were bumped a week earlier as a test.
California Wonder peppers at 24 days.
My fellow AOG club members are growing all sorts of plants for transplanting into your vegetable and ornamental beds.  Come out and support the Austin Organic Gardeners' plant sale.  Hope to see you there.